



By the Quarter
Quarter-by-Quarter
| Team | Q1 | Q2 | Q3 | Q4 | Final |
|---|---|---|---|---|---|
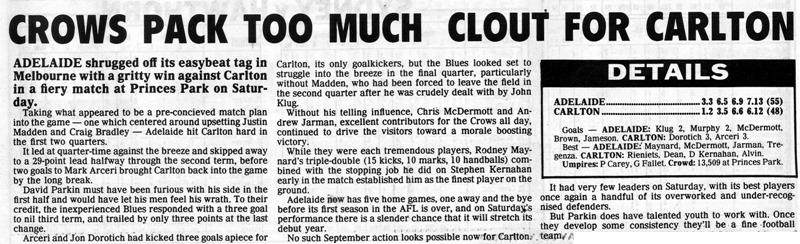
| Carlton | 1.2 8 | 3.5 23 | 6.6 42 | 6.12 48 | 48 |
| Adelaide | 3.3 21 | 6.5 41 | 6.9 45 | 7.13 55 | 55 |
The Match
Match Report
Umpires: P.Carey, G.Fallett
Goalkickers: M.Arceri 3, J.Dorotich 3.
Best: T.Rieniets, P.Dean, D.Kernahan, T.Alvin.
Game Review
A terribly-small crowd saw a low-scoring loss by the Blues to the Crows in wet and slippery conditions.
Team
| B: | 36 Tim Rieniets | 28 David Kernahan | 35 Peter Dean |
| HB: | 37 Adrian Bassett | 14 Michael Sexton | 15 Simon Verbeek |
| C: | 12 Adrian Gleeson | 21 Craig Bradley (vc) | 32 David Glascott |
| HF: | 7 Brett Ratten | 4 Stephen Kernahan (c) | 39 Peter White |
| F: | 40 Andrew Cavedon | 6 Jon Dorotich | 17 Mark Arceri |
| Ruck: | 44 Justin Madden | 31 Tom Alvin | 19 Andrew Phillips |
| Interchange: | 16 Chris Bond | 11 Glenn Hawker | |
| Coach: | David Parkin | ||
Milestones
Last Games: Glenn Hawker played his 27th and final game, and Peter White played his third and final game for the Blues.
100 Games: Adrian Gleeson
Score Records: This remains Carlton's lowest ever score against the Crows.
Brownlow Votes
3 - Andrew Jarman (Crows)
2 - Chris McDermott (Crows)
1 - Adrian Gleeson
By the Numbers
Player Statistics

Carlton
| # | Player | KI | HB | DI | MK | GL | BH | GA | IF | MI | UP | BO | TK | RB | 1% | FF | FA | CP | CM | CL | CG | HO | BR | %P |
|---|---|---|---|---|---|---|---|---|---|---|---|---|---|---|---|---|---|---|---|---|---|---|---|---|
| 4 |  Stephen Kernahan | 11 | - | 11 | 8 | - | - | - | - | - | - | - | 1 | - | - | 1 | 2 | - | - | - | - | 5 | - | - |
| 6 |  Jon Dorotich | 8 | 4 | 12 | 7 | 3 | 1 | - | - | - | - | - | - | - | - | 1 | - | - | - | - | - | 1 | - | - |
| 7 |  Brett Ratten | 15 | 8 | 23 | 3 | - | 1 | - | - | - | - | - | 1 | - | - | 2 | 2 | - | - | - | - | - | - | - |
| 11 |  Glenn Hawker | - | 1 | 1 | - | - | - | - | - | - | - | - | - | - | - | - | - | - | - | - | - | - | - | - |
| 12 |  Adrian Gleeson | 15 | 3 | 18 | 3 | - | 1 | - | - | - | - | - | 4 | - | - | 2 | 2 | - | - | - | - | - | 1 | - |
| 14 |  Michael Sexton | 2 | 4 | 6 | 2 | - | - | - | - | - | - | - | 2 | - | - | - | - | - | - | - | - | - | - | - |
| 15 |  Simon Verbeek | 14 | 6 | 20 | 6 | - | 1 | - | - | - | - | - | 2 | - | - | 1 | 1 | - | - | - | - | - | - | - |
| 16 |  Chris Bond | 14 | 1 | 15 | 4 | - | - | - | - | - | - | - | 1 | - | - | 1 | 2 | - | - | - | - | - | - | - |
| 17 |  Mark Arceri | 9 | 5 | 14 | 1 | 3 | 1 | - | - | - | - | - | 3 | - | - | 5 | 1 | - | - | - | - | - | - | - |
| 19 |  Andrew Phillips | 14 | 5 | 19 | - | - | - | - | - | - | - | - | 2 | - | - | 4 | 1 | - | - | - | - | - | - | - |
| 21 |  Craig Bradley | 14 | 4 | 18 | 2 | - | - | - | - | - | - | - | 3 | - | - | 3 | 1 | - | - | - | - | 2 | - | - |
| 28 |  David Kernahan | 15 | - | 15 | 3 | - | - | - | - | - | - | - | - | - | - | 3 | 1 | - | - | - | - | - | - | - |
| 31 |  Tom Alvin | 7 | 5 | 12 | 2 | - | 1 | - | - | - | - | - | 1 | - | - | - | 1 | - | - | - | - | - | - | - |
| 32 |  David Glascott | 9 | 3 | 12 | 1 | - | - | - | - | - | - | - | 1 | - | - | 1 | 2 | - | - | - | - | - | - | - |
| 35 |  Peter Dean | 10 | 7 | 17 | 3 | - | - | - | - | - | - | - | - | - | - | - | - | - | - | - | - | 1 | - | - |
| 36 |  Tim Rieniets | 16 | 9 | 25 | 3 | - | - | - | - | - | - | - | 1 | - | - | 2 | - | - | - | - | - | - | - | - |
| 37 |  Adrian Bassett | 8 | 8 | 16 | 1 | - | - | - | - | - | - | - | 5 | - | - | 1 | 2 | - | - | - | - | - | - | - |
| 39 |  Peter White | 5 | 6 | 11 | 1 | - | - | - | - | - | - | - | 4 | - | - | 1 | 1 | - | - | - | - | - | - | - |
| 40 |  Andrew Cavedon | 8 | 2 | 10 | 4 | - | 2 | - | - | - | - | - | - | - | - | 1 | 3 | - | - | - | - | 8 | - | - |
| 44 |  Justin Madden | 6 | 1 | 7 | 2 | - | - | - | - | - | - | - | 1 | - | - | 2 | 1 | - | - | - | - | 5 | - | - |
| Team Total | 200 | 82 | 282 | 56 | 6 | 8 | - | - | - | - | - | 32 | - | - | 31 | 23 | - | - | - | - | 22 | 1 | - | |
| Team Average | 10.0 | 4.1 | 14.1 | 2.8 | 0.3 | 0.4 | - | - | - | - | - | 1.6 | - | - | 1.6 | 1.1 | - | - | - | - | 1.1 | 0.1 | - | |
Photos from Carlton vs Adelaide
Last updated by Club Archive ·