



Quarter-by-Quarter
| Team | Q1 | Q2 | Q3 | Q4 | Final |
|---|---|---|---|---|---|
| Richmond | 3.4 22 | 6.10 46 | 8.17 65 | 16.26 122 | 122 |
| Carlton | 3.4 22 | 6.11 47 | 9.15 69 | 9.16 70 | 70 |
Match Report
Umpire: R.Sleeth
Goalkickers: R.McLean 3, S.Jackson 2, T.Keogh 1, P.Jones 1, I.Robertson 1, R.Walls 1.
Best: B.Gill, V.Waite, T.Keogh, P.Pinnell, G.Southby, R.McLean, A.Gallagher, R.Walls.
Reports: Nil
Injuries: P.Jones (bruised thigh)
Game Review
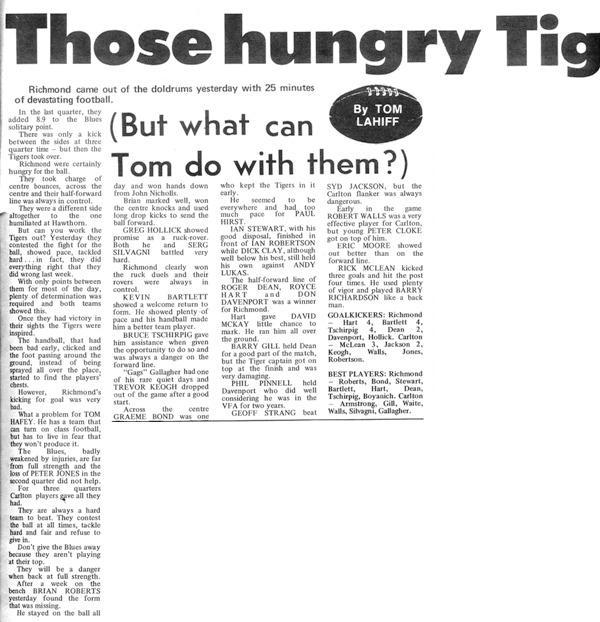
After a shaky start the Blues had recorded 4 successive wins and were beginning to look dangerous.
At three-quarter time this was anyone's game. The scores had been virtually level throughout and a cliff-hanger seemed certain. Then, disaster. Richmond piled on 8-9 to a solitary point as the Blues put in an abject display.
A "senior Carlton official" was quoted as saying "this is the first time I've seen an entire team chuck a match in". (Source: The Melbourne Sun). A sorry day indeed.
Team
| B: | 19 Ian Collins | 20 Geoff Southby | 30 Vin Waite |
| HB: | 21 Barry Gill | 43 David McKay | 15 Phil Pinnell |
| C: | 49 Andy Lukimitis | 34 Ian Robertson | 8 Trevor Keogh |
| HF: | 33 Paul Hurst | 42 Robert Walls (vc) | 5 Syd Jackson |
| F: | 28 Peter Jones | 14 Ricky McLean | 12 Barry Armstrong |
| Ruck: | 2 John Nicholls (c) | 1 Serge Silvagni | 10 Adrian Gallagher |
| Res: | 46 John Warden | 38 Mark Amos | |
| Coach: | Ron Barassi | ||
Note: Andrew Lukimitis changed his name to Lukas in 1971.
Milestones
Debut : John Warden
50 Games : Syd Jackson
150 Games : Ian Collins
Player Statistics

Carlton
| # | Player | KI | HB | DI | MK | GL | BH | GA | IF | MI | UP | BO | TK | RB | 1% | FF | FA | CP | CM | CL | CG | HO | BR | %P |
|---|---|---|---|---|---|---|---|---|---|---|---|---|---|---|---|---|---|---|---|---|---|---|---|---|
| 1 |  Sergio Silvagni | 15 | - | 15 | 4 | - | - | - | - | - | - | - | - | - | - | 3 | 2 | - | - | - | - | - | - | - |
| 2 |  John Nicholls | 7 | 2 | 9 | 1 | - | - | - | - | - | - | - | - | - | - | 3 | 4 | - | - | - | - | 12 | - | - |
| 5 |  Syd Jackson | 7 | 2 | 9 | 4 | 2 | - | - | - | - | - | - | - | - | - | - | 2 | - | - | - | - | - | - | - |
| 8 |  Trevor Keogh | 11 | 2 | 13 | 1 | 1 | 1 | - | - | - | - | - | - | - | - | 2 | 2 | - | - | - | - | - | - | - |
| 10 |  Adrian Gallagher | 15 | 2 | 17 | 5 | - | 1 | - | - | - | - | - | - | - | - | 1 | - | - | - | - | - | - | - | - |
| 12 |  Barry Armstrong | 21 | - | 21 | 3 | - | 1 | - | - | - | - | - | - | - | - | 4 | 2 | - | - | - | - | - | - | - |
| 14 |  Ricky McLean | 10 | 1 | 11 | 5 | 3 | 5 | - | - | - | - | - | - | - | - | 1 | 5 | - | - | - | - | - | - | - |
| 15 |  Phillip Pinnell | 13 | 1 | 14 | 6 | - | - | - | - | - | - | - | - | - | - | - | 1 | - | - | - | - | - | - | - |
| 19 |  Ian Collins | 11 | 1 | 12 | 2 | - | - | - | - | - | - | - | - | - | - | 4 | 4 | - | - | - | - | - | - | - |
| 20 |  Geoff Southby | 7 | 4 | 11 | 2 | - | - | - | - | - | - | - | - | - | - | 3 | 1 | - | - | - | - | - | - | - |
| 21 |  Barry Gill | 14 | 4 | 18 | 5 | - | - | - | - | - | - | - | - | - | - | 2 | 2 | - | - | - | - | - | - | - |
| 28 |  Peter Jones | 3 | - | 3 | 3 | 1 | - | - | - | - | - | - | - | - | - | - | 1 | - | - | - | - | 2 | - | - |
| 30 |  Vin Waite | 17 | 2 | 19 | 5 | - | - | - | - | - | - | - | - | - | - | 7 | 4 | - | - | - | - | - | - | - |
| 33 |  Paul Hurst | 7 | 6 | 13 | - | - | 1 | - | - | - | - | - | - | - | - | 1 | 3 | - | - | - | - | - | - | - |
| 34 |  Ian Robertson | 11 | 3 | 14 | 6 | 1 | - | - | - | - | - | - | - | - | - | 2 | 3 | - | - | - | - | - | - | - |
| 38 |  Mark Amos | 6 | - | 6 | 4 | - | 2 | - | - | - | - | - | - | - | - | 1 | 2 | - | - | - | - | 3 | - | - |
| 42 |  Robert Walls | 12 | 3 | 15 | 5 | 1 | 4 | - | - | - | - | - | - | - | - | 2 | 2 | - | - | - | - | - | - | - |
| 43 |  David McKay | 5 | 1 | 6 | 2 | - | - | - | - | - | - | - | - | - | - | 1 | 1 | - | - | - | - | 3 | - | - |
| 49 |  Andrew Lukas | 9 | 3 | 12 | 5 | - | 1 | - | - | - | - | - | - | - | - | - | 2 | - | - | - | - | - | - | - |
| Team Total | 201 | 37 | 238 | 68 | 9 | 16 | - | - | - | - | - | - | - | - | 37 | 43 | - | - | - | - | 20 | - | - | |
| Team Average | 10.6 | 1.9 | 12.5 | 3.6 | 0.5 | 0.8 | - | - | - | - | - | - | - | - | 1.9 | 2.3 | - | - | - | - | 1.1 | - | - | |
Photos from Richmond vs Carlton
Last updated by Club Archive ·