



Quarter-by-Quarter
| Team | Q1 | Q2 | Q3 | Q4 | Final |
|---|---|---|---|---|---|
| North Melbourne | 2.3 15 | 7.3 45 | 11.4 70 | 14.7 91 | 91 |
| Carlton | 3.5 23 | 5.9 39 | 9.10 64 | 15.13 103 | 103 |
Match Report
Umpire: Sawyer.
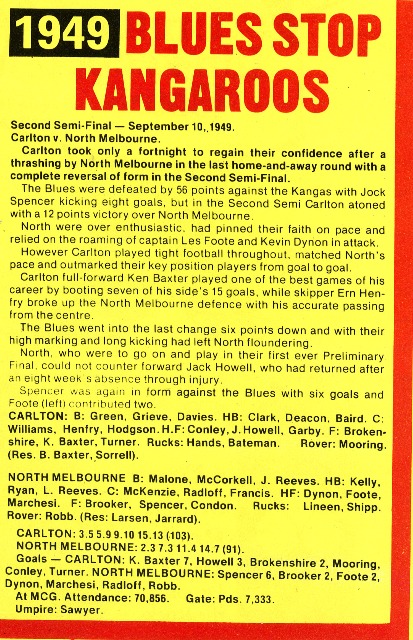
Goalkickers: K.Baxter 7, J.Howell 3, G.Brokenshire 2, J.Mooring 1, J.Conley 1, H.Turner 1.
Best: E.Henfry, K.Baxter, K.Hands, J.Baird, J.Clark, F.Davies, H.Turner, J.Howell.
Reports: Injuries: A.Hodgson (jaw)
Game Review
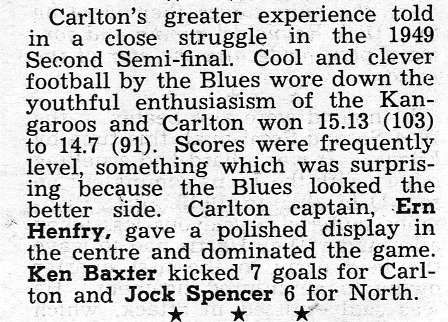
North took a slender half-time lead, partly due to superior play and partly due to Carlton's inaccurate kicking. After the half-time break the Blues improved their play, and proved to be so strong through the middle of the ground that North had to play out wide.
By three quarter time Carlton had closed to within a goal, but should have been in front but for their kicking, having 5 more scoring shots than North. The Blues kicked 6 goals to 3 in the last quarter to run out 2 goal winners and book a place in the Grand Final
Marks
Carlton 21 25 18 22 - Total 86
N.Melb 13 15 13 14 - Total 55
Frees
Carlton 8 17 11 * - Total 35
N.Melb 8 6 8 5 - Total 27
.*The Sporting Globe's stats for Carlton's free kicks are incorrect, 36 up to the end of the third quarter, perhaps Total is 45?
Team
B: | 33 Ritchie Green | 27 Ollie Grieve | 28 Fred Davies |
HB: | 25 Jim Baird | 23 Bert Deacon (vc) | 26 Jim Clark |
C: | 24 Arthur Hodgson | 6 Ern Henfry (c) | 12 Doug Williams |
HF: | 35 Jack Conley | 13 Jack Howell | 20 Ray Garby |
F: | 31 Geoff Brokenshire | 21 Ken Baxter | 7 Herb Turner |
Ruck: | 1 Ken Hands | 29 Frank Bateman | 16 Jim Mooring |
Res: | 34 Bernie Baxter | 14 Alan Sorrell | |
Coach: | Percy Bentley | ||
Milestones
Last Game (Carlton): Alan Sorrell
100 Goals: Herb Turner
Player Statistics

Carlton
| # | Player | KI | HB | DI | MK | GL | BH | GA | IF | MI | UP | BO | TK | RB | 1% | FF | FA | CP | CM | CL | CG | HO | BR | %P |
|---|---|---|---|---|---|---|---|---|---|---|---|---|---|---|---|---|---|---|---|---|---|---|---|---|
| 7 |  Herb Turner | - | - | - | - | 1 | - | - | - | - | - | - | - | - | - | - | - | - | - | - | - | - | - | - |
| 13 |  Jack Howell | - | - | - | - | 3 | - | - | - | - | - | - | - | - | - | - | - | - | - | - | - | - | - | - |
| 16 |  Jim Mooring | - | - | - | - | 1 | - | - | - | - | - | - | - | - | - | - | - | - | - | - | - | - | - | - |
| 21 |  Ken Baxter | - | - | - | - | 7 | - | - | - | - | - | - | - | - | - | - | - | - | - | - | - | - | - | - |
| 31 |  Geoff Brokenshire | - | - | - | - | 2 | - | - | - | - | - | - | - | - | - | - | - | - | - | - | - | - | - | - |
| 35 |  Jack Conley | - | - | - | - | 1 | - | - | - | - | - | - | - | - | - | - | - | - | - | - | - | - | - | - |
| Team Total | - | - | - | - | 15 | - | - | - | - | - | - | - | - | - | - | - | - | - | - | - | - | - | - | |
| Team Average | - | - | - | - | 2.5 | - | - | - | - | - | - | - | - | - | - | - | - | - | - | - | - | - | - | |
Last updated by Jamie Sanderson ·